KIẾN THỨC
How to DIY Beautiful Wallpaper
03/03/2022
Step 1: Prepare tools
Necessary tools: cutlery, wall putty, sandpaper and plastic scraper, standard tape measure, glue (milk glue or powder glue), towel, Rulo, A-scale ...
Step 2: Treat the wall ( important)
Before gluing, we must treat the wall clean, flat and not let the dirt reduce the adhesion. Note that even if there is a wall acne (due to paint or plaster, cement .. deposited) there is also a problem. may float to the surface of the sticker paper. If the wall is too bad, convex and rough, many cracks should be reprocessed (using plaster to cover the wall ..) because it will sag the paper. For walls that are too old, wallpapering needs to be more careful need to clean again, do not let mold, damp because this will reduce the life of the paper. A note for homeowners whose walls are too wet, water seeps through the wall a lot, we advise not to paste paper because "water runs off rocks" let alone paper !!
There are already papered walls. Many people still leave the old paper and glue it on. According to experts, that shouldn't be the case. When gluing, the inner layer of paper must be strong. Because if it is peeled off, it will damage the whole new layer of glued paper. Gluing on top of this old paper, you have to mix more dense glue to be effective. For non-workers, it is very difficult to guarantee this glue to be glued to the old paper.
Step 3: Remove the items on the wall.
When applying wallpaper, you should remove the objects on the wall to make it easy to paste the paper. Remember to mark the places to hang the objects.
Placing the bed and cabinets away from the edge of the wall will make it convenient for you to construct and close the edge.
Step 4: Mix glue paper paste
There are two types of glue commonly used for wall stickers: milk glue and powder glue. Milk glue has anti-mildew effect and powder glue is moisture-proof for walls.
You mix the powder glue first. Each bag of glue powder can be mixed with 5 liters of water. But at first, you have to pour 1/3 of the amount of water and stir well with your hands to form a water spiral that prevents clumping. When the glue has dissolved evenly, you just add the amount of water to just the right standard to paste the glue. Then we pour milk glue in. Because milk glue has better adhesion than powder glue, depending on the area of gluing, give more or less
To judge the adhesion of the glue is good or not, we use a wand to plug into the selected glue pot. If the chopsticks fall, it means the glue is thin and watery. If the chopsticks stand upright, the glue has reached the standard.
You take a little glue mixed to separate 1 small case. Add milk glue to it and mix well to sweep the edges of the paper to make the paper stick more firmly and evenly at the edges to make it easier to fit the edges.
Step 5: Cut the wallpaper
The first step before gluing the wallpaper. You will need to measure the wall to get the correct height for the paper to be cut evenly. In addition, you need to measure the length, height of the window, the angles to calculate correctly and save paper.
For paper with no pattern, one color, or stripes, you just need to cut as many sheets as necessary to the height of the wall, remember to cut the paper so that it is 5-10 cm more than the height of the wall.
As for patterned paper, you have to compare flowers by cutting a piece of paper according to the height of the wall, then place the next sheet next to the cut sheet to compare flowers and then cut. By doing so, the new pattern uniforms the whole house.and the absolute accuracy of the patterns when grafting.
Step 6: Roll the glue
Roll the glue directly on the back of the paper, pay attention to roll the entire surface of the paper, roll quickly and then fold them, when folding, avoid letting the glue stick to the surface of the paper. This makes the paper soft and evenly moist, avoiding blistering and sagging when pasting. There is a case where we think that we will absorb water (lime wall, old wall ..) we have to roll up the whole wall.
There is one more way to do it is Dip the back of the water, let it drain, and then roll the glue on the wall, in my experience, this method is not guaranteed. Because the paper has absorbed water, it is difficult to catch the glue, the adhesion to the wall is poor. The life of the paper will decrease. So avoid doing it this way.
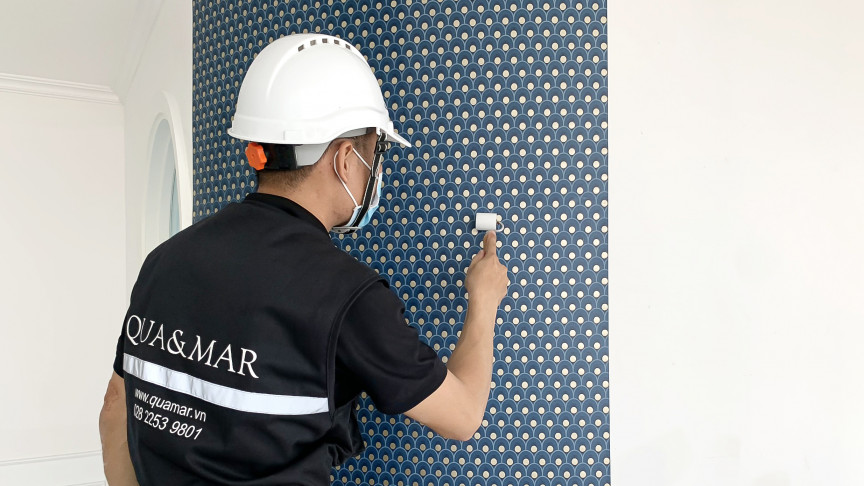
Step 7: Carry out construction wallpaper
Choosing the starting point: This is very important because the starting point is also the end point here the pattern is uneven, so it is recommended to choose hidden corners to hide this defect.
The first sheet of paper will be the most important, you must place it very straight because the following sheets will follow this first sheet. For those who are pasting for the first time, you should use a beam or use a string to tie a heavy object and then draw a line and then place the edge of the paper of the first sheet along that line. When placing the paper, please add 3-5 cm more than the ceiling edge to cut it to fit the ceiling and the wall (above we have already cut 5-10 inches, so we are not afraid of lack of paper!!).
Use a mica paper scraper from top to bottom to remove all the bubbles inside
Step 8: Edit edges and cut excess paper
Use the turntable to press the excess paper corners and use
When gluing is done, you still have to deal with the seams. Ideally, you need to add more concentrated glue (the glue is separate on top) to these edges to avoid the situation that it will peel off for a while.
You also need to keep an eye on the corners, protruding edges of the wall, and cutouts in the shape of the fixture taking up the wall. If left unattended, these areas are more prone to flaking than other areas.
Step 9: Wipe the glue and finish
At this point, you only need to do the final step, wipe the paper again to avoid glue areas on the surface, using a sponge (also known as a sponge) is the best. Reinstall the items you removed So you have a beautiful wall perfect!!
Other